
Install a car neck or lumbar pillow only while the vehicle is parked and switched off. Place the pillow at the intended part of the seat, route the elastic strap around a compatible section, and adjust it in small steps. Before driving, confirm that the pillow and strap remain clear of the head restraint, seat belt, airbags, controls and your normal driving movement.
Before installation: inspect the seat
Do not begin by stretching the strap around the first available part of the seat. Take a minute to identify:
- Seat-mounted airbag seams or labels.
- Seat-belt anchors and belt guides.
- Head-restraint posts, releases and adjustment controls.
- Power-seat switches, levers and folding mechanisms.
- Any opening where a strap could slip, rub or become pinched.
If you cannot route the strap without crossing one of these areas, do not install the pillow on that seat.
Step 1: Confirm which pillow you have
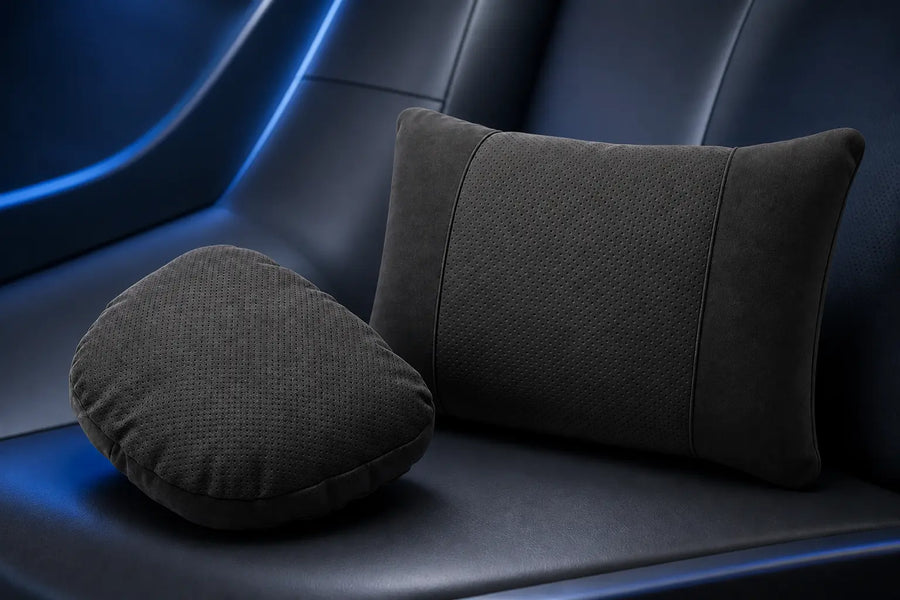
The smaller rounded style is the Neck Pillow. The wider, three-panel style is the Lumbar Pillow.
This distinction matters because the neck pillow belongs near a compatible headrest or upper seatback, while the lumbar pillow belongs against the lower seatback. Reversing the positions can make the cushion feel awkward and may change your seating position more than intended.
Step 2: Start with the strap loose
Place the pillow against the seat before tightening or stretching the rear elastic strap. Check that the front surface faces the occupant and that the pillow is not twisted.
Route the strap around a compatible part of the seat. It should hold the pillow in place without pulling on trim, airbag seams, seat-belt hardware or controls.
Step 3: Position a neck pillow
Sit in your normal position and place the rounded pillow near the gap below the head restraint or along the upper seatback. The Car Gadget Store neck style offers two rear strap-height positions.
Test the lower setting first, then the higher setting if necessary. The pillow should not push the head forward, prevent the head restraint from adjusting or change your view of the road.
Make every adjustment while parked.
Step 4: Position a lumbar pillow
Place the rectangular three-panel pillow against the lower seatback. Begin low and make small upward adjustments until it fills the intended gap.
Avoid placing it so high that it acts like an upper-back cushion. After each change, check that your hips remain fully back in the seat and that your normal reach to the steering wheel and pedals has not changed.
Step 5: Run a complete control check
Before driving, confirm all of the following:
- The factory head restraint still operates and can be positioned correctly.
- The seat belt lies normally across the body and retracts without obstruction.
- The pillow and strap are clear of every visible airbag seam.
- Seat controls, release levers and folding mechanisms remain accessible.
- You can see clearly and reach the wheel and pedals normally.
- The pillow stays in place when you enter, exit and settle into the seat.
If any check fails, reposition or remove the pillow.
Common installation mistakes
Choosing appearance before placement
A pillow may look symmetrical at the center of the seat but still sit too high or too low for the occupant. Use your normal seating position as the reference.
Pulling the strap too tight
Excess tension can distort the pillow, pull on seat trim or make the strap migrate. It needs to be secure, not overstretched.
Covering a side-airbag seam
Never assume a soft accessory is harmless over an airbag area. Follow the vehicle owner’s manual and keep both the pillow and strap completely clear of the seam.
Adjusting while driving
Do not reach behind the seat or move the pillow while the vehicle is in motion. Park safely before making any change.
Treating the pillow as medical equipment
This type of product is an interior comfort accessory. It is not designed to treat pain, correct posture, prevent injury or replace a factory head restraint.
Cleaning without damaging the surface
Follow the care label supplied with the pillow. For routine surface cleaning, use a soft damp cloth, blot rather than scrub, and allow the pillow to air dry completely before reinstalling it.
Do not machine wash, apply heat or use cleaning chemicals unless the product label specifically allows it.
What customer feedback says about adjustment
The live product page displayed a 4.9 out of 5 average from 14 reviews when this guide was prepared. A detailed review praised the adjustable strap for allowing the pillow to be placed higher or lower, while other comments focused on softness, material quality and cabin appearance.
That feedback is useful, but seat geometry still matters. A good result in one vehicle does not guarantee identical placement in another.
A better installation is a reversible installation
The best setup is easy to reposition or remove. If the pillow changes visibility, pedal reach, steering control, seat-belt fit or access to a safety feature, remove it and return the seat to its normal configuration.
View the pillow styles, colors and current fit guidance.